
3D Graphics
Unity + Claude MCP Connection Complete Guide — How to Manipulate Scenes with MCP
What It Means to Connect Claude Directly to Unity
There’s already momentum in several directions when it comes to integrating AI tools into game development workflows. Some paths specialize in machine learning training, like Unity ML-Agents. Others hook into cloud-based AI backend services. But these approaches typically involve complex setup, or they’re designed for purposes outside of scene editing.
unity-mcp takes a different route. It’s a bridge that lets Claude read and write directly inside the Unity Editor. You can spawn objects, add components, and adjust scene layouts using natural language. Install it by pasting a single git URL into Package Manager—that’s it. The barrier to entry is lower than other AI integration methods.
This guide walks through installing unity-mcp from scratch through your first prompt test. Rather than just a step-by-step tutorial, we’ll dig into what choices you need to make at each stage and where errors might crop up. Since this is a beta tool, we’ve flagged uncertain items clearly.
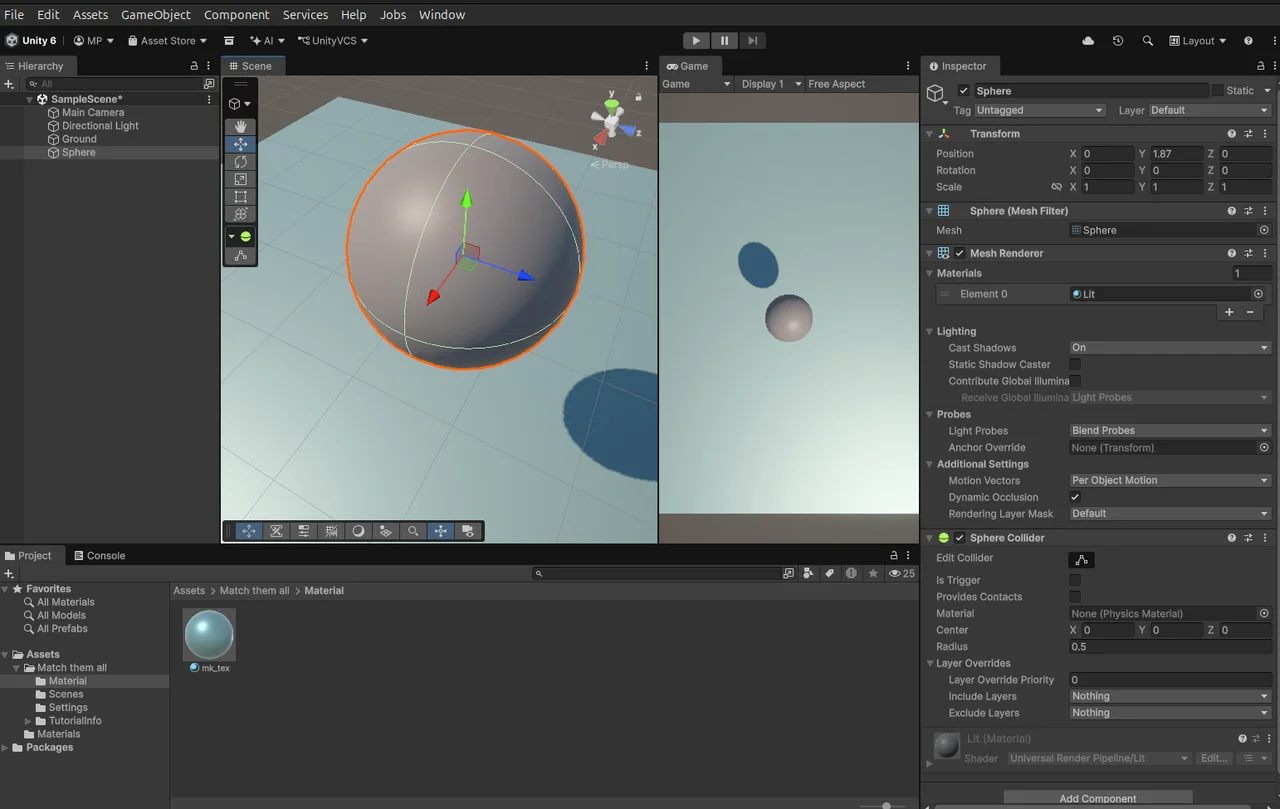
What Is Unity MCP?
MCP (Model Context Protocol) is a connection standard created by Anthropic for AI and external applications. It gives AI models a standardized interface to read data and execute actions within specific apps. Claude already works through MCP with file systems, databases, and web services. Unity connects the same way.
unity-mcp is an open-source package built by CoplayDev. Once installed in your Unity project, it opens a channel where Claude can create or edit scene objects, modify C# scripts, and even trigger builds. No messy legacy integration or separate plugin infrastructure—just a single git URL through Package Manager.
It supports both Claude Desktop and Claude Code (CLI). Unity Editor includes a menu that auto-detects connection settings, so you often won’t need to manually edit JSON config files.
What You Need Before Installing
Installation itself is fast, but skip the prerequisites and you’ll hit a wall during connection. Nail down your Python environment and Claude client choice beforehand.
Unity Version Compatibility
Official docs confirm support from Unity 2021.3 LTS through 6.x. Versions outside that range aren’t explicitly listed, so check your current project version first. For the safest bet with latest features, stick with a recent LTS or newer.
Python Environment
unity-mcp requires Python 3.10 or higher. Official docs recommend uv for Python environment management. Node.js isn’t listed as a dependency in the official docs, so you don’t need to install it separately.
Choose Your Claude Client
Pick Claude Desktop or Claude Code (CLI) before you start. Claude Desktop’s auto-detection mostly works with Unity. Claude Code’s auto-detection isn’t documented, so you may need to manually edit config files. Config file locations differ between the two.
| Client | Config File Path (Windows) | Auto-Detection |
|---|---|---|
| Claude Desktop | %APPDATA%\Claude\claude_desktop_config.json | Confirmed |
| Claude Code (CLI) | .claude/settings.json or ~/.claude/settings.json | Unconfirmed |
Git and Network Setup
Since you’re using git URL installs through Package Manager, Unity needs to reach external Git repos. Corporate firewalls or VPN setups might block GitHub access, so verify ahead of time. On Windows, use forward slashes (/) as path separators—backslashes (\) will throw errors.
Start with Claude Desktop and only switch to manual setup if auto-detection fails. If you’re on Claude Code, plan for manual config from the jump.
Installing unity-mcp in Package Manager
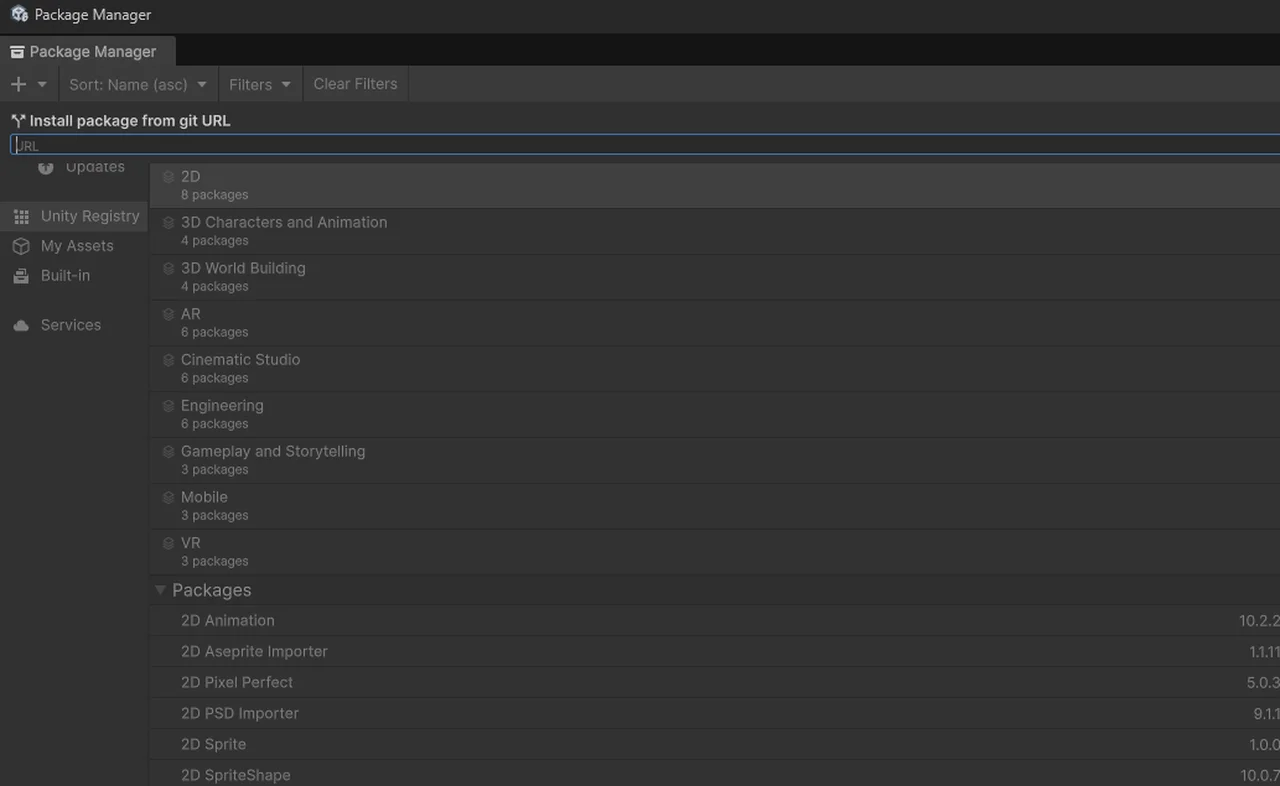
Three installation paths exist. The most common is Package Manager’s git URL method. OpenUPM command-line and Unity Asset Store options are official too.
| Install Path | Method | Notes |
|---|---|---|
| Package Manager (git URL) | Direct URL Entry | Most Common |
| OpenUPM | CLI Command | See Official Install Guide |
| Unity Asset Store | Asset Store Page | GUI Installation |
Step-by-Step Git URL Installation
- From the top menu in the Unity Editor, Window → Package Manageropen
- Click the + button in the top left corner and Add package from git URLSelect it.
- Paste the URL below exactly as shown.
https://github.com/CoplayDev/unity-mcp.git?path=/MCPForUnity#main - To use the Beta channel, replace
#mainwith#betaat the end of the URL. - AddClick the button and wait for the installation to complete.
- Once installation finishes, verify that the Window → MCP for Unitymenu has been created.
If you run into installation errors, check the Unity console window first—that’s where you’ll find the actual error message. Most “cannot find package” errors come down to either a typo in the URL or network connectivity issues. If you’re running Unity below 2021.3 LTS, it could be a package compatibility problem.
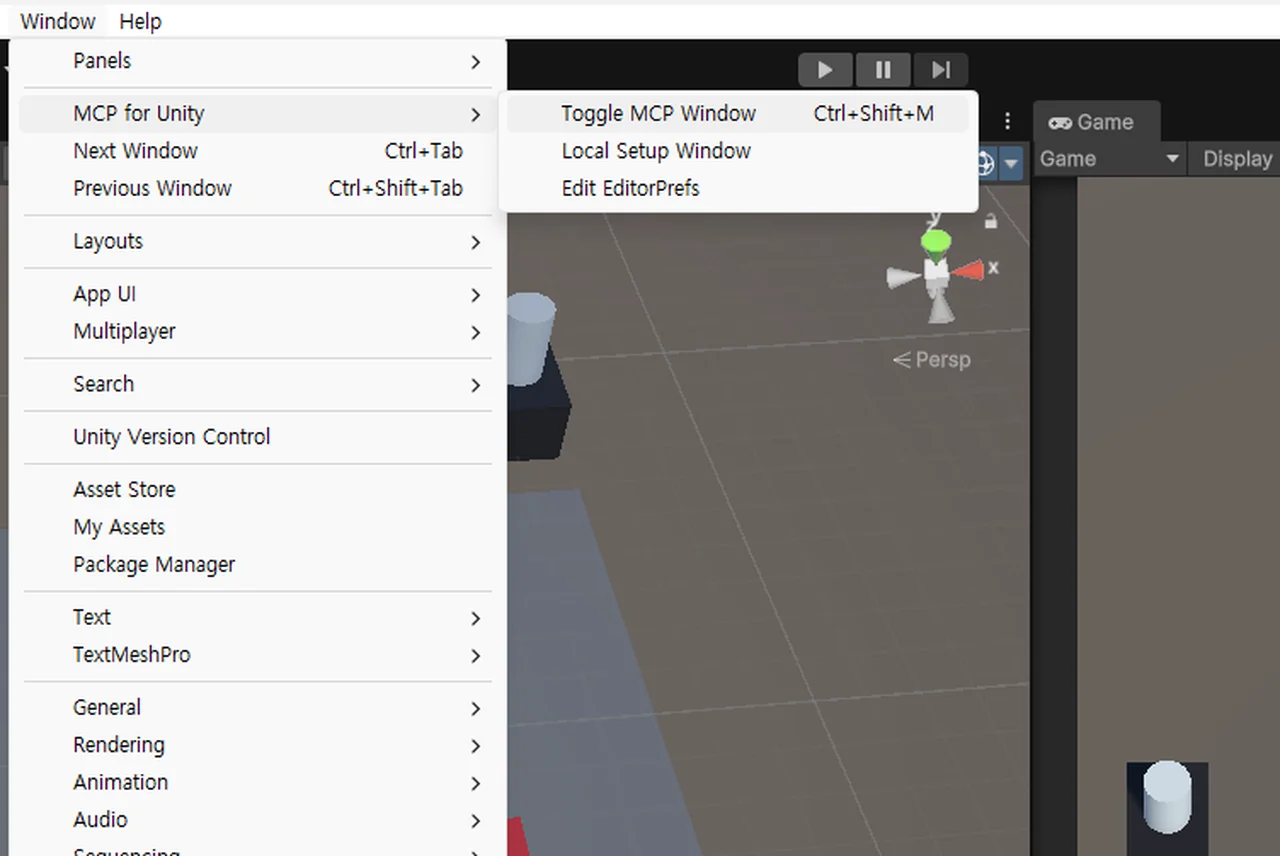
Connecting to Claude Desktop / Claude Code
Once the package installs, a new menu item appears in the Unity editor. This is where you configure your connection to the Claude client.Window → MCP for Unityis added to the Unity editor menu. Configure your Claude client connection from within this menu.
Auto-detection connection
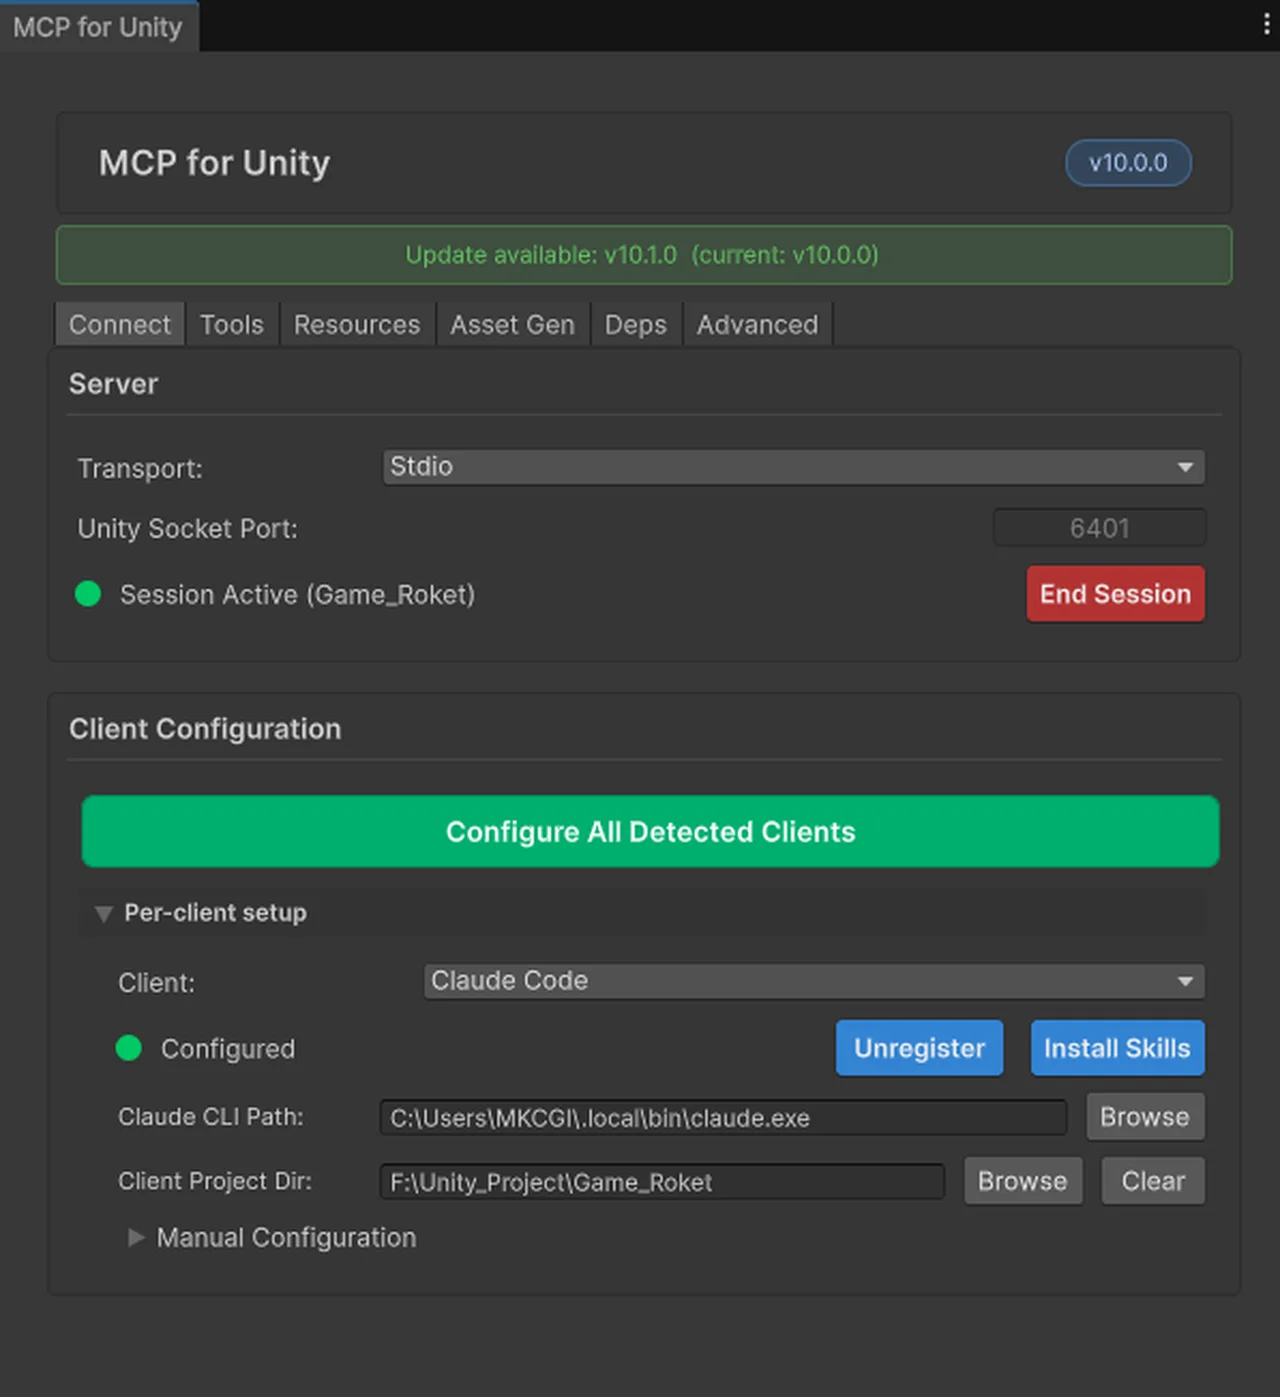
Window → MCP for Unity → Configure All Detected ClientsRunning this will have Unity automatically detect your installed Claude client and push the configuration over. In most cases with Claude Desktop installed, this method works reliably. After running it, restart Claude Desktop to activate the Unity MCP server.
Claude Code (CLI) manual setup
If you’re using Claude Code, auto-detection might not work. In that case, you’ll need to manually add the MCP server entry to your config file. The config file lives in your project folder at .claude/settings.json or in your user home directory at ~/.claude/settings.json. Check the unity-mcp official documentation for the exact formatting of what you need to add.
Verifying the connection
After restarting Claude Desktop (or Claude Code), the Unity MCP server should appear in your connection list. In Claude Desktop, you can see active MCP servers in the settings or chat interface. Keep the Unity editor in focus and active while testing the connection—if it’s minimized or backgrounded, the connection can become unstable.
Your first prompt test—does it actually work?
Once you’re connected, the fastest way to verify everything is working is to send Claude a command directly. Based on the official documentation’s “Your First Prompt” section, start with this:
"Create a red, blue, and yellow cube in the current scene."
Run this and Claude should create three cubes in your scene through the Unity MCP server. Open your Scene view and confirm the objects appeared. If nothing shows up, the connection isn’t live yet—head back to the setup steps.
| Difficulty | Test prompt | Expected Results |
|---|---|---|
| Beginner | “Create a red, blue, and yellow cube in the current scene.” | Generate 3 color cubes |
| Intermediate | “Create a cube at the origin and add a Rigidbody.” | Generate cubes + apply physics components |
| Advanced | “Arrange a row of 5 spheres with randomized positions.” | Generate 5 randomly placed spheres |
Once you’ve passed the beginner test, move on to the intermediate prompt. If object creation and component assignment—like adding a Rigidbody—execute reliably in a single command, you’ve got a solid foundation for everyday scene prototyping work.
Common Errors and Troubleshooting
The errors below are real cases reported in the CoplayDev/unity-mcp GitHub Issues. The solutions provided are guidelines only—check the official issue tracker directly for the most current information.
Claude Desktop Auto-Detection Fails
This is the most frequent issue. If you’ve run “Configure All Detected Clients” but Unity MCP still doesn’t show up in Claude Desktop, manually open Claude Desktop’s config file (%APPDATA%\Claude\claude_desktop_config.json) and verify it was written correctly. If the file is empty or missing the MCP server entry, you’ll need to add it by hand.
Windows: “The handle is invalid. (os error 6)”
On Windows, the headless server process terminates unexpectedly during startup. This is a Windows-specific issue with stdin/stdout handle management—check the official issue tracker for relevant threads. Different terminal environments (PowerShell vs CMD vs Windows Terminal) may or may not reproduce the problem.
Windows: “pywin32 os error 32” (During Config File Creation)
File lock conflict when creating or overwriting the config file on Windows. This happens when another text editor or program has the config file open. Close all editors and related applications, then try again.
Stuck in “busy: compiling” State
After a domain reload, all MCP server functions hang in a busy state. Switching the Unity editor to play mode and back to edit mode—or restarting the editor entirely—typically resolves the issue.
Intermittent Connection Drops
The HTTP bridge connection can drop when the Unity editor runs in the background or loses focus. Keep the Unity editor active while working. Pay attention when switching to other applications in multi-monitor setups.
Connection takes longer than installation. The most common friction points are Claude Desktop auto-detection failures, Windows file lock conflicts, and dropped connections from editor inactivity. Since each has a different troubleshooting path, read the error message carefully and address accordingly.
What You Can Actually Do
The feature set confirmed in the official README is broader than you’d expect. It goes beyond scene object editing to include C# script generation and modification, package management, test execution, and builds.
| Task Type | Example Prompt | Expected Output |
|---|---|---|
| Create an Object | “Create a red cube at (0, 0, 0).” | Generate a red cube at a specified position |
| Add a Component | “Add a Rigidbody to the selected object.” | Apply physics components |
| Scene Layout | “Arrange a grid of spheres in a 3×3 pattern.” | Arrange spheres in a 3×3 grid |
| Generate a Script | “Create a script that prints Hello World on Start.” | Create New C# File |
| Build | “Build the current scene for Windows.” | Trigger Windows Executable Build |
This feature list reflects the official documentation, but real-world stability depends on prompt specificity and scene complexity. Simple object creation and position editing work reliably, while intricate scene structures or advanced component setups can produce unexpected results. For build and script generation features, direct testing is the most accurate way to verify scope.
Realistic use cases center on initial scene layout blocking, repetitive object placement, and rapid prototyping workflows. Full-fidelity content generation and complex game logic implementation still have limitations. Positioning this tool as “a quick way to test ideas in your scene” rather than “automation for finished work” narrows the gap between expectations and reality.
unity-mcp excels at accelerating scene prototyping. You’ll see genuine time savings when handling repetitive object placement through natural language or rapidly implementing early layout concepts. Script generation and build automation are listed features, but validate them directly in your own pipeline before trusting them on production work.
Why unity-mcp — comparing approaches
unity-mcp isn’t the only way to integrate AI with Unity. Depending on your goals, other tools might be a better fit, so establishing clear selection criteria upfront makes sense.
| Approach | Primary Use | vs. unity-mcp |
|---|---|---|
| unity-mcp | Natural language scene manipulation, fast prototyping | Easy install, direct editing |
| Unity ML-Agents | Machine learning agent training | Different objective entirely (training vs. editing) |
| Cloud AI integration | Backend services, runtime AI features | Higher setup complexity, no editor access |
unity-mcp’s distinction stems from its foundation on the MCP standard protocol. Currently it’s designed exclusively for Claude, but if MCP expands to other AI services, you could theoretically repurpose the same structure. That said, this isn’t confirmed yet—adopting based on extensibility hopes is premature.
The Beta status matters too. Not every Unity feature is covered, and behavior can shift with version updates. Rather than plugging it straight into your production pipeline, start by testing scope in a separate project, then decide on adoption. That’s the safer approach.
FAQ
Are there Unity version requirements?
Official documentation confirms support from Unity 2021.3 LTS through 6.x. Older versions below that range have no stated support. Check your project runs 2021.3 LTS or later first. The latest LTS release will likely be the most stable.
Do I need to install Node.js separately?
No. The official CoplayDev/unity-mcp documentation makes no mention of Node.js as a dependency. What you need is Python 3.10 or higher, and the docs recommend uvfor Python environment management. Some unofficial sources mention Node.js, but stick with the official documentation.
What’s the difference between the Beta channel and main branch?
Swap the install URL ending to either #main or #beta. #main is the stable release and #beta includes newer features in experimental form. Beta gets you cutting-edge features faster, but expect occasional bugs or undocumented behavior changes. Start with #main on your first install, then reassess whether to switch to Beta once stability is confirmed.
unity-mcp dominates other Unity AI integration methods in setup and connection simplicity. A git URL in Package Manager, run Configure All Detected Clients, restart Claude—three steps to a natural language scene editing environment. Expect genuine time savings on scene layout prototyping and repetitive object placement.
Keep in mind it’s still Beta. Complex scene editing and script automation appear in the feature list but need hands-on validation. Windows users may hit pywin32 errors or connection instability, and Claude Code (CLI) users might need manual configuration. Before committing to your production pipeline, test the tool’s boundaries in a sandbox project. Right now, its most practical role is as a fast entry point for idea validation and initial layout blocking.
※ This article is based on the official CoplayDev/unity-mcp GitHub documentation and real production environments. Version, licensing, and commercial use availability may change—consult the official docs to stay current.