
3D Graphics
Normal Map, Bump Map, or Displacement Map? A Practical Guide for 3D Artists
The Core Differences Between Normal Maps, Bump Maps, and Displacement Maps
In 3D work, you’ll eventually run into the same question: “Which map should I actually use?” Bump maps, normal maps, and displacement maps all show up when artists add surface detail to rocks, brick, skin wrinkles, armor, and hard-surface assets. They can look similar at first because all three can make a surface appear bumpy, but they work in very different ways.
This article is not about memorizing definitions. The goal is to give you practical criteria for choosing the right map in the right situation, whether you are working in Blender, Maya, Unreal Engine, Substance Painter, Arnold, or V-Ray.
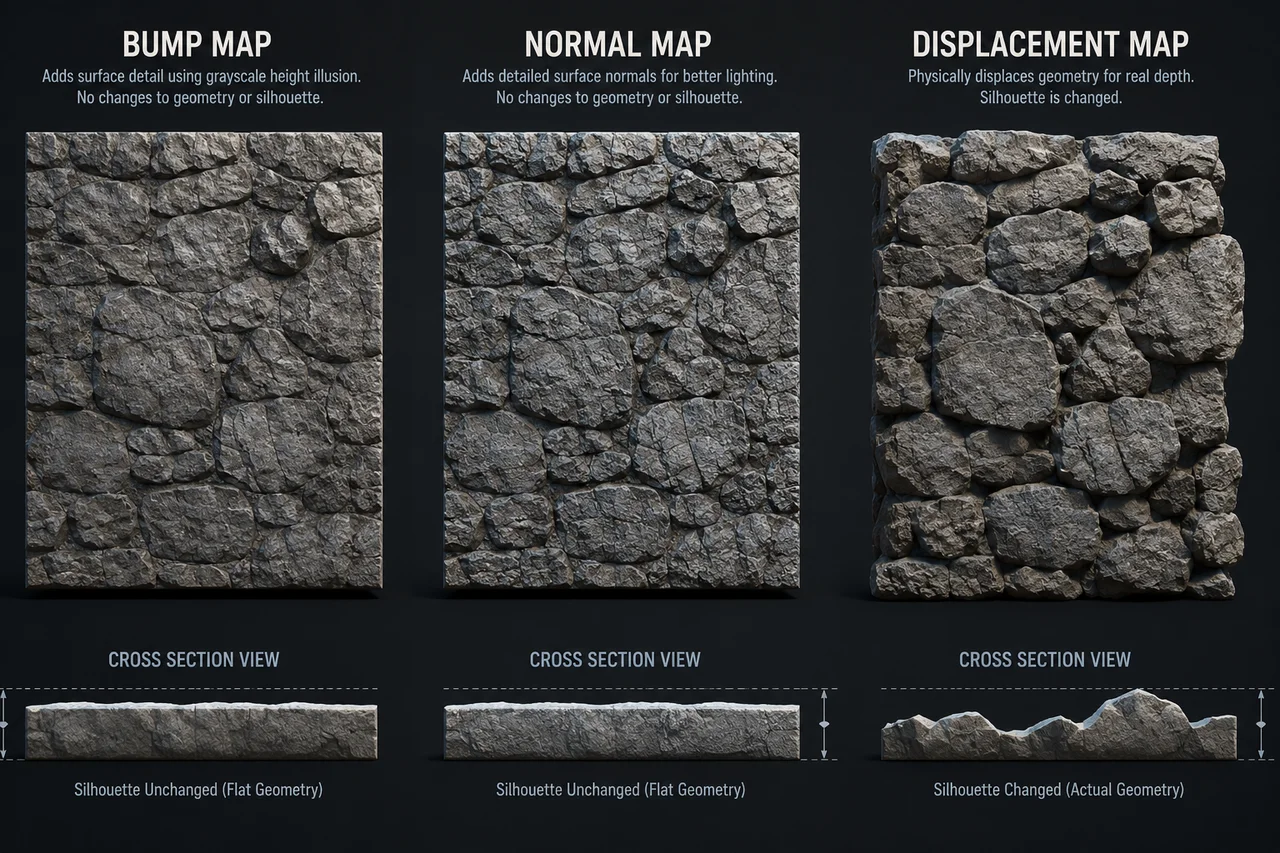
There are two core questions: Does the actual geometry change? and How much does it cost in rendering or real-time performance? Bump maps and normal maps fake surface detail through lighting. Displacement maps change the shape itself. That distinction is the heart of this guide.
| Map Type | How It Works | Core Characteristic |
|---|---|---|
| Bump Map | Height values shift normals | Lightweight, silhouette unchanged |
| Normal Map | RGB stores direction vectors | Game and real-time standard |
| Displacement Map | Moves geometry | Silhouette changes, high render cost |
When Should You Use Bump Maps?
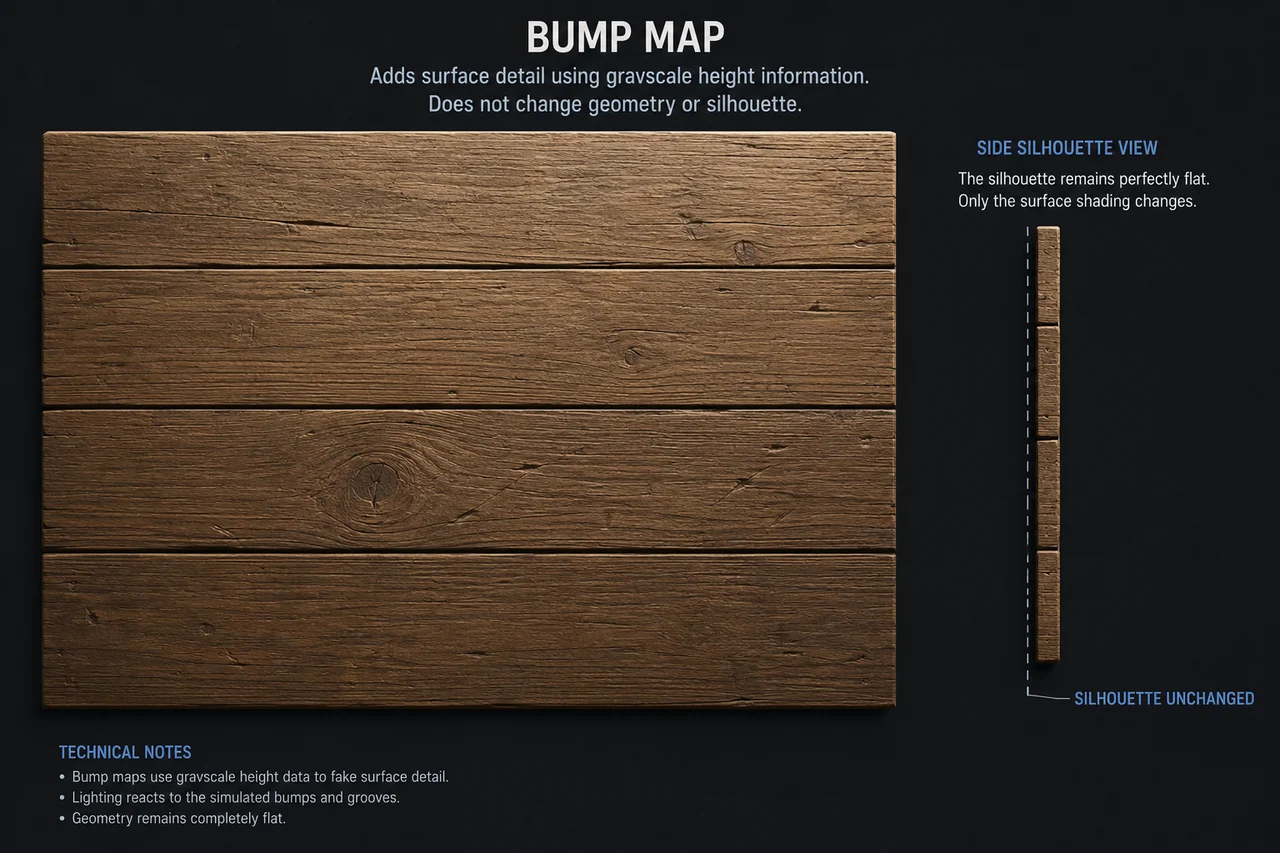
Bump mapping is the classic approach. A grayscale image describes surface height, and the shader uses those brightness values to adjust the surface normal. This creates the appearance of height without changing the actual geometry. The render cost is low and setup is straightforward, which makes bump maps useful for quick tests and lightweight surface detail.
Bump maps work best when the camera is far away or the silhouette is not important. Distant background walls, wood grain, metal scratches, and subtle surface noise are all good examples. In those cases, the detail only needs to show up through lighting response.
They fall short with close-up skin wrinkles, rocky outlines, or deep grooves in character armor. The surface may look bumpy, but the outline stays flat, so the illusion breaks quickly. Bump maps are not useless, but they work best in a narrower set of situations.
| Map Type | Best For | Avoid If |
|---|---|---|
| Bump Map | Distant backgrounds, subtle surface roughness | Close-ups, silhouette is critical |
| Normal Map | Game assets, real-time projects | Renders that require silhouette change |
| Displacement Map | Film VFX, close-ups, product renders | Full real-time game application, low-poly mesh |
When Should You Use Normal Maps?
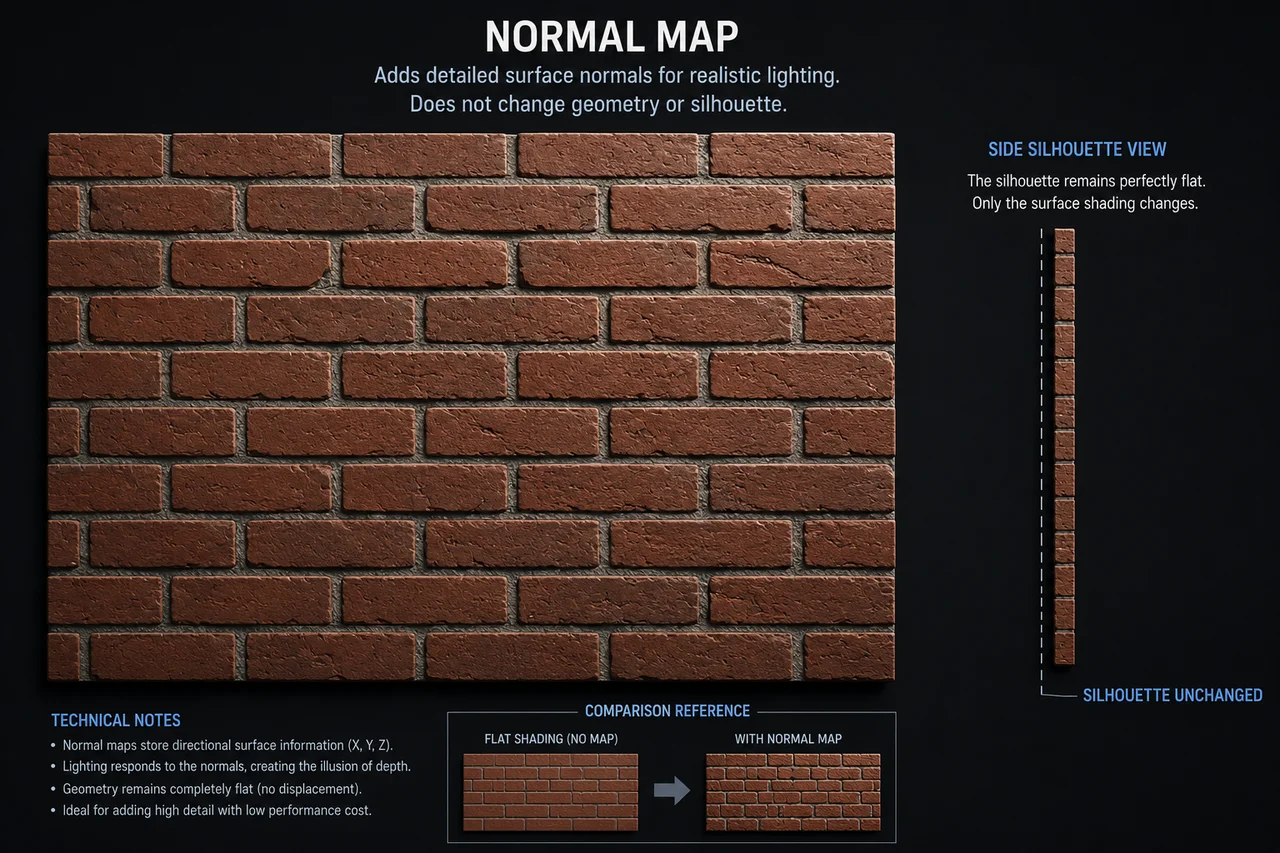
Normal maps store surface direction data in RGB channels. The familiar purple-blue look is not meant to be interpreted as visible color. It represents X, Y, and Z direction information packed into an image. By reading that data and adjusting the normal direction per pixel, the shader creates the appearance of detail without adding geometry.
Normal maps are well suited for game characters, environment assets, Unreal Engine and Unity projects, and hard-surface details like panel lines, scratches, bolts, and rivets. They are especially powerful when you bake high-poly detail onto a low-poly game mesh. If you are building real-time assets for a portfolio, normal maps should usually be your default choice.
Normal maps still do not change the actual shape. The silhouette stays the same. Their limitations become obvious in extreme close-ups, rocks that need a physically broken outline, or product renders where shadows and contact detail must be exact. Normal maps are not “fake and bad.” They are the most efficient standard for real-time work, as long as you remember that they do not change silhouettes.
Why Do Game Engines Use Normal Maps More?
Real-time engines like Unreal Engine and Unity must process rendering every frame. Increasing actual geometry means vertex count, memory, shadow calculations, LOD switching, collision handling, and draw cost all rise together. Normal maps only shift surface direction via texture, so the effect-to-cost ratio is much better.
AAA games use normal maps not because they are low quality, but because turning every scratch, pore, and rivet into actual geometry would be inefficient in real-time rendering. The standard workflow is to bake detail from a high-poly model and apply that baked normal map to a lower-poly in-game asset.
Game engines can also use techniques such as Parallax Mapping or Unreal Engine’s Bump Offset. These use height maps to shift UVs and create a stronger sense of depth. They can make a surface feel deeper without adding polygons, but they still do not change the actual silhouette. Engine-specific features vary by version, so always check the official documentation.
| Scenario | Recommended Approach | Why |
|---|---|---|
| General game asset | Normal map | Balance performance and detail |
| Mobile game | Optimized normal map | Save geometry cost |
| Surface depth boost | Parallax / Bump Offset | Illusion of depth without polygons |
| Film-quality close-up | Displacement | Silhouette and shadow need real change |
When Should You Use Displacement Maps?
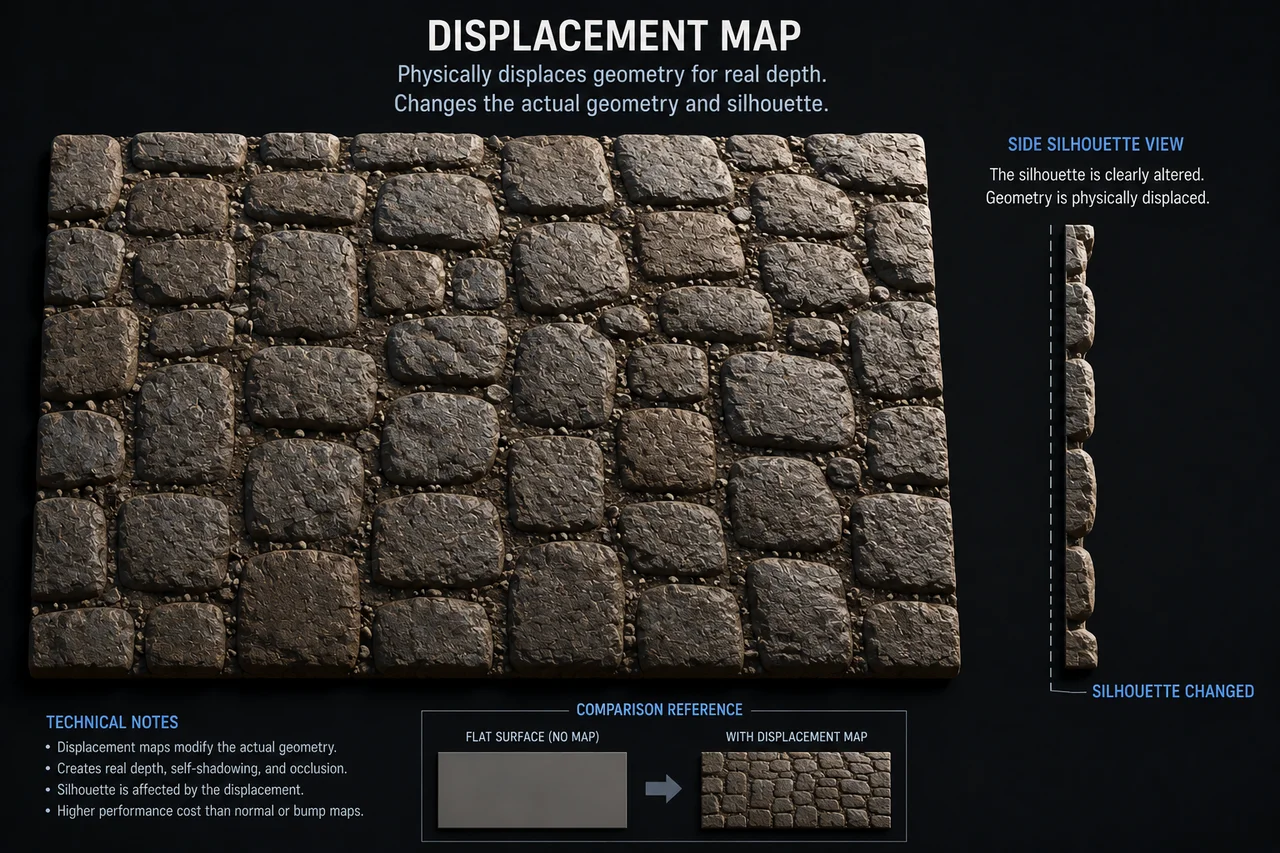
Displacement maps are not lighting tricks. They move the surface itself, usually by moving vertices or render-time geometry. That means silhouettes can change, and shadows and contact detail can line up with real shape. For film VFX, product rendering, character close-ups, terrain, and rock surfaces where actual height matters, displacement can deliver a level of realism that bump and normal maps cannot.
Offline rendering workflows in tools such as Blender, Maya, Arnold, and V-Ray often use displacement for close-up quality. Skin wrinkles, pores, scars, cliff edges, and deep product grooves all benefit when the surface truly changes shape.
In real-time games, however, displacement needs to be used carefully. It requires enough subdivision or tessellation, and both render cost and setup complexity increase. The point is not that displacement is always better. It is that displacement is the right choice when silhouette, shadow, and close-up shape matter.
| Work Goal | Recommended Map | Why |
|---|---|---|
| Game character | Normal map | Balance performance and detail |
| Mobile game | Normal map focus | Save geometry cost |
| Distant background | Bump map | Silhouette matters less |
| Film close-up | Displacement | Actual shape change required |
| Product render | Displacement | Surface relief and shadow precision |
| Fine scratches | Bump map or normal map | Lightweight surface response |
Where Does a Height Map Fit?
Many beginners confuse Height Map, Bump Map, and Displacement Map as the same thing. A Height Map is a grayscale image holding height data. Each pixel’s brightness represents surface height. This data alone doesn’t determine the result. Where you plug it in does.
Connect the same height map to a bump input and you get a bump effect: only the lighting response changes. Use it as source data for normal conversion and it can help generate a normal map. Plug it into a displacement input and it can move real geometry. When you paint in the Height channel in Substance Painter and that height information is baked or exported into other maps, this is the principle at work. A height map is input data, not the final technique itself.
Different tools label Height, Bump, and Displacement differently, so judging by “which input does it feed” and “what does it move” is safer than trusting map names alone.
| Term | Meaning | Used At |
|---|---|---|
| Height Map | Grayscale height data | Bump, normal conversion, displacement |
| Bump Map | Changes lighting response from height | Bump / Height Input |
| Displacement Map | Moves geometry from height values | Displacement Input |
Why Isn’t Displacement Showing Up?
If your map is connected but nothing changes, it’s almost always a settings issue, not the map itself. Checking these four things in order is the fastest way to troubleshoot.
Not Enough Subdivision Means No Vertices to Move
Displacement works by moving actual surface points, so the mesh needs enough geometry for detail to appear. Connect a displacement map to a very low-poly plane and you will barely see any change. Both Blender and Maya workflows require sufficient subdivision or tessellation for displacement to work properly. The exact setup varies by tool.
Material Displacement Method Is Set to Bump Only
In many Blender material setups, displacement can appear as bump only unless the material and render settings allow true displacement. To actually change geometry, you may need to set the material’s displacement method separately. Terms such as “Bump Only,” “Displacement,” and “Displacement and Bump” may appear depending on version and renderer. If your map looks like a bump effect when it should move geometry, check this setting first.
8-Bit Images May Not Be Enough for Displacement
8-bit images can only record 256 height values. It’s hard to capture a wide displacement range precisely, which can cause banding and stepping artifacts. For close-ups and high-quality renders, 16-bit or 32-bit images are safer. File size and memory matter too, so 32-bit isn’t always essential, but film-grade work often requires 32-bit floating point.
Also Check Color Space and Scale Settings
Height Maps and Displacement Maps should usually be read as Raw, Non-Color, or Linear. Reading them as sRGB applies color correction and distorts the actual height values. Most DCC tools and renderers treat height data as Data rather than Color, with color space conversion disabled as standard practice.
Scale or Midlevel values are easy to overlook. The map might be connected correctly, but if displacement scale is too small, you’ll see barely any change. If it’s too large, the surface tears or becomes exaggerated. Wrong Midlevel or Offset can make the entire surface bulge or sink, so test renders help dial it in.
| Symptom | Cause | Setting to Check |
|---|---|---|
| No visible change | Insufficient subdivision | Mesh subdivision, Tessellation |
| Looks like bump only | True displacement off | Material displacement method |
| Stepping artifacts | 8-bit map in use | Switch to 16-bit / 32-bit image |
| Surface puffs up strangely | Scale / Midlevel error | Adjust Scale, Midlevel, Offset values |
| Height values are wrong | Color Space error | Set to Non-Color, Raw, Linear |
So Which Map Should You Actually Choose?
There is no single best map. The right choice depends on what is visible in the shot, how close the camera is, whether the silhouette matters, and how much performance budget you have. Real-time games and game assets usually start with normal maps. Subtle distant texture often works fine with bump maps. For product renders, film VFX, and close-ups where silhouette and true depth matter, displacement maps become the priority.
In real production, you often do not pick just one. You combine them. Large forms and silhouettes can use displacement, mid-range detail can use normal maps, and fine surface texture can use bump maps. In a rock close-up, for example, large cracks might use displacement, smaller surface cracks might use normal maps, and barely visible noise might use bump maps.
| Detail Level | Recommended Map | Example |
|---|---|---|
| Large forms and silhouettes | Displacement Map | Rock cracks, terrain undulation, deep skin wrinkles |
| Mid-range detail | Normal Map | Pores, panel lines, rivets, surface cracks |
| Fine surface texture | Bump Map | Small noise, scratches, surface roughness |
When combining, keep intensity low and roles clear. If Normal Maps and Height-based Bump both emphasize the same detail, the surface gets messy.
Frequently Asked Questions
Which is better: normal maps or bump maps?
Neither is universally better. Bump maps are lightweight for simple height-based surface changes, while normal maps encode more precise directional information, so they’re preferred for real-time games and PBR materials. Professional workflows often use normal maps as the base and add bump maps for very fine surface roughness. Choose the map that fits your goal, not the one that seems superior.
Can’t you use displacement maps in games?
You can, but real-time games must balance performance, memory, LOD, and render cost, so normal maps are the usual default. Parallax, tessellation, and virtual geometry features vary by engine and might apply to specific surfaces. Since this article focuses on decision-making across all three, check your engine’s official docs for implementation details per version.
What’s the most common reason displacement doesn’t show?
Usually it’s settings, not the file. Subdivision or Tessellation is too low, Material displacement method is set to bump-only instead of true displacement, you’re using an 8-bit map causing stepping, Color Space is reading as sRGB, or Scale and Midlevel values are wrong. Check these five things in order before replacing the map file.
What matters in real work isn’t which map is superior—it’s knowing what your project needs. If the camera is far away and performance matters, bump or normal maps might be enough. If silhouette changes matter or you’re shooting close-ups where shape itself must read, displacement maps fit better.
The best choice isn’t using the heaviest technique available. It’s delivering the required quality as efficiently as possible. Real-time work often makes normal maps the most practical choice, and simple surface texture often works fine with bump maps. Displacement maps are a powerful tool you reach for when maximum quality is necessary. The key is picking based on purpose and budget—not blindly choosing one of the three.
※ This article is based on public resources and real production experience. Versions, licensing, and commercial availability may change, so please check official documentation as well.