
Knowledge
How to Use OCIO Correctly – Maya, Nuke, AE Integration Guide (For Professionals)
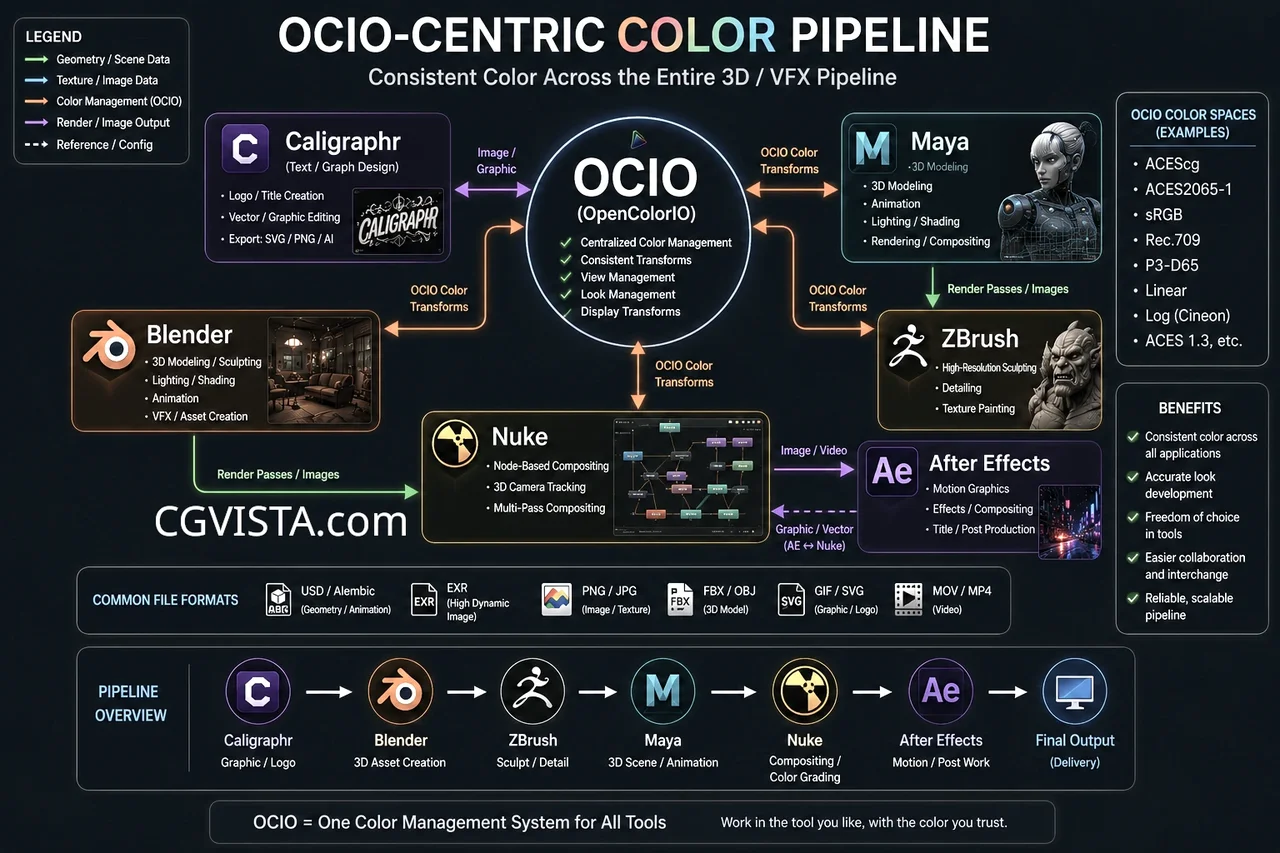
Have you ever experienced rendering hard in Maya only to find the colors look completely different when brought into Nuke? Or finished final compositing in After Effects only to see completely different colors on the client’s monitor? The solution to all these problems is OCIO (OpenColorIO). In this article, we’ll guide you step-by-step through the core concepts of OCIO and practical integration methods in three tools—Maya, Nuke, and After Effects—so even beginners can follow along immediately.
Understanding Color Management Basics and Core OCIO Concepts
OCIO (OpenColorIO) is, in simple terms, a “common language that makes all programs see color the same way.” It’s a complete color management solution specialized for film and VFX pipelines, originally developed by Sony Imageworks and now established as the industry standard. To explain with an everyday analogy: when people from different countries speak different languages, having one interpreter allows everyone to communicate. Similarly, OCIO mediates between different programs like Maya, Nuke, and After Effects so they interpret color identically. All of OCIO’s color science knowledge is contained in a single file: the config.ocio configuration file. Inside this file, all transformation (Transform) rules are defined, specifying “how to process when converting from this color space to that color space.” Once you specify the path to this config.ocio file in your local environment, all applications that support OCIO will share the same color conversion system. A concept frequently associated with OCIO is ACES (Academy Color Encoding System). ACES is a color space standard adopted by major studios like Pixar and Disney, supporting a much wider color gamut than traditional sRGB, enabling richer color expression. For CG rendering work, a sub-color space called ACEScg is primarily used, and all major renderers like RenderMan and Arnold support it.- ①IDT (Input Device Transform): Converts the color space of input sources like cameras or textures to ACES internal space
- ②RRT (Reference Rendering Transform): Converts scene-based data to display-ready data, applies S-curve tone mapping
- ③ODT (Output Device Transform): Final color conversion for output devices like monitors or cinema projectors
- ④config.ocio: Project-level configuration file containing all the above rules
- ⑤OCIO environment variable: OS-level setting that tells all apps the location of the config file
💡 TIP
Color space information for image files must be included as a string in the filename. For example, if you name a texture file “diffuse_acescg.exr” with the color space name in the filename, OCIO will automatically recognize the file’s color space. File extensions and metadata are ignored during color processing, so you must strictly follow the filename convention.
OCIO Configuration and Render Integration in Maya
In Maya 2022 and later versions, the default color space is already set to ACEScg, and the default view transform is also set to “ACES Output Transform for sRGB.” In other words, if you’re using recent Maya, the ACES default settings are already applied without any additional manipulation. However, problems arise if you’re unaware of this and modify the settings, or if you incorrectly specify the color space of textures imported from outside. Let’s follow step-by-step how to set up OCIO directly in Maya and integrate it with the Arnold renderer.- Open the OS environment variable settings window, create a new OCIO variable, and enter the full path to the config.ocio file as its value. (Example: C:/OCIO/aces_1.3/config.ocio) — This single line is the starting point for all integration.
- Run Maya and from the top menu, open Windows → Rendering Editors → Render Settings.
- In the Render Settings window, find the Color Management tab and verify that OCIO is activated. If it’s not activated, check the box and verify that the config path specified above is automatically detected.
- Verify that the Rendering Color Space is set to ACEScg. This is the color space where actual render calculations occur.
- The View Transform is for viewing on a monitor, so select ACES Output Transform for sRGB. However, note that this setting is only for viewport display and must not be baked into the file when saving as EXR.
- For each texture file loaded in the scene, manually specify the original color space of that file in the Color Space item of the Hypershade or File node. If it’s an sRGB texture, select sRGB; if it’s already made in ACEScg, select ACEScg.
- Set the render output format to OpenEXR and use 32-bit float for bit depth. EXR is the only practical format that can save ACES linear data without loss.
⚠ WARNING
When saving an OpenEXR file, absolutely never bake the View Transform into the file. In an ACES workflow, render results must be saved exactly as ACEScg color space. If an EXR with baked view transform is brought into Nuke, the color gets transformed twice, causing highlights to crush and color distortion.
Building an OCIO Color Pipeline in Nuke
Nuke is the most widely used compositing tool in the VFX industry and natively supports OCIO. Building an OCIO pipeline in Nuke can be summarized in three principles: “declare the color space of incoming images accurately, work in linear space, and convert to the correct color space when exporting.”- Before running Nuke, verify in the terminal (or nuke.env file) that the OCIO environment variable points to the config.ocio path. It should point to the same config file you set in Maya.
- From the Nuke top menu Edit → Project Settings → Color tab, select OCIO for Color Management and verify that the OCIO config path is correctly set.
- When importing an EXR file rendered from Maya using a Read node, be sure to set the node’s colorspace item to ACEScg. The file contains ACEScg linear data.
- In the Viewer node, set View Transform to ACES Output Transform for sRGB (or the appropriate ODT for your working monitor specs). This setting only changes how it appears on the monitor and doesn’t affect the actual data.
- Conduct all compositing work in ACEScg linear space. Use OCIOColorSpace nodes to add explicit color space conversions only when necessary.
- In the final Write node, set the output file to EXR and maintain colorspace as ACEScg when saving. For delivery files, create a separate Write node with ODT applied to convert to the appropriate color space like Rec.709, then save.
💡 TIP
The most common mistake in OCIO pipelines is double-linearizing an image that’s already been converted to linear. If you incorrectly specify the colorspace in a Read node, the image gets transformed twice, causing abnormal brightness changes. Make it a habit to verify what color space each file was saved in every time you load it.
After Effects OCIO Plugin Integration Practical Tips
After Effects doesn’t natively support OCIO and requires a separate plugin. You can use the representative OCIO for After Effects (free open-source) plugin or the commercial plugin Prolost OCIO. The principle is the same as Nuke. However, since After Effects users have traditionally been accustomed to 8-bit or 16-bit color space work, you need to start by switching to 32-bit mode.- In After Effects Project Settings (File → Project Settings → Color Settings), be sure to change Color Depth to 32 bits per channel (float). ACES linear data will suffer data loss if not in 32-bit float.
- After installing the OCIO plugin, add it as an effect to the layer in the composition you want to work on. Generally accessible via Effect → Utility → OCIO.
- In the plugin settings, specify the same config.ocio file path your project is using in the Config File item.
- Set Input Color Space to the color space of the imported EXR file (ACEScg), and set Output Color Space according to your viewing purpose or delivery target (sRGB for monitor confirmation, Rec.709 for delivery, etc.).
- To verify the color appears correctly in the viewer, check that display color management is enabled for the entire AE project in View → Use Display Color Management.
- When doing the final render output, set the format to OpenEXR in the Output Module, and determine whether to embed color profile according to pipeline rules. For intermediate delivery files, maintain ACEScg; for final delivery, apply ODT and output as Rec.709.
⚠ WARNING
When importing EXR files in After Effects, AE may automatically apply color space conversion. Always check the Color Profile item in Interpret Footage (File → Interpret Footage → Main) after importing the file, and if automatic conversion that conflicts with the OCIO plugin is applied, set it to “Preserve RGB” to prevent double transformation.
Strategy for Maintaining Color Consistency Between Maya, Nuke, and AE
The core strategy for maintaining color consistency when binding three tools into a single pipeline is simple: “Have all programs point to one single config.ocio file.” Following this principle alone ensures that colors appear consistently across each tool.- ①Keep only one config.ocio file on a project server or shared drive, and have the entire team designate this file through the OCIO environment variable. Using different configs on each personal computer is the biggest mistake.
- ②Always use OpenEXR 32-bit float format when exchanging files. 8-bit formats like JPEG and PNG cannot contain ACES data and should not be used in pipelines.
- ③Always indicate color space information in filenames. Example: shot_010_comp_v003_acescg.exr. This single habit prevents mistakes across the entire team.
- ④OCIO environment variables (OCIO_ACTIVE_DISPLAYS, OCIO_ACTIVE_VIEWS) can absorb display setting differences between team members. List them separated by colons in priority order. Example: sRGB:P3
- ⑤When you need to modify the config file, always validate it using the ociocheck command-line tool. Running ociocheck –iconfig path/config.ocio in the terminal immediately identifies errors like duplicate color space names or undefined references.
- ⑥When distributing config and external LUT files together, use the ocioarchive tool to create an .ocioz archive file for distribution. However, archives created on OCIO 2.4 or earlier Windows may not open on Linux/macOS, so be sure to create them with OCIO 2.5 or later.
- ⑦Manage config separately by project (show), and before starting work on a new show, always update the environment variable to that show’s config path. If the previous show’s environment variable remains, color errors will occur silently.
💡 TIP
Never confuse the display transform (View Transform, how it appears on the monitor) with the actual image data (the color space stored in the file). “Looking pretty in the viewer” doesn’t mean the file data is saved correctly. Always re-check the color space settings of the Write node or Output Module separately before final saving—this is basic professional pipeline practice.
In the end, the core of an OCIO pipeline is simple. Unify all tools with one config file, always exchange files as ACEScg linear EXR, and explicitly declare color space when loading files in each tool. Following just these three principles will solve 90% of the color mismatch problems you’ve experienced so far.